Final Prototype
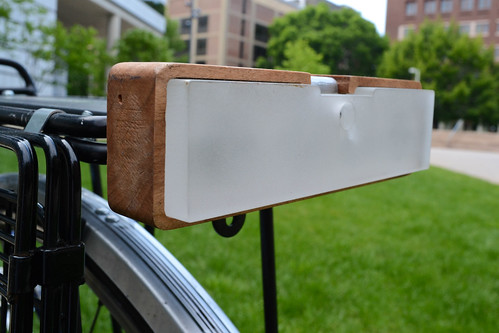
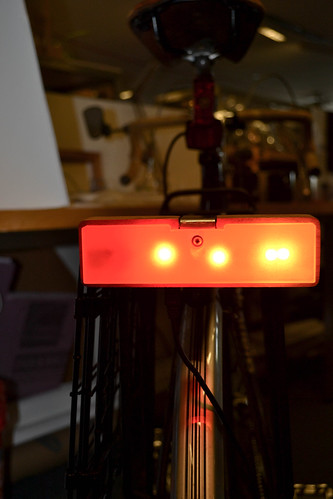
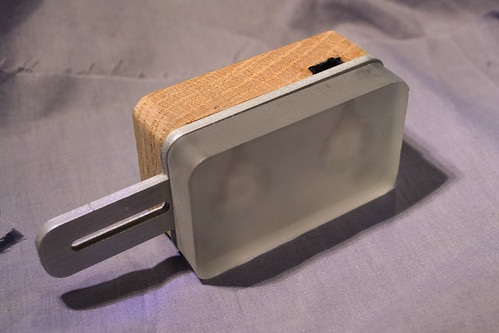
Since most savvy souls won’t make it much further than this — here’s some shots of the final prototype. You might wonder why the light isn’t blinking in most of these shots. It is because it is out of batteries, that’s why.
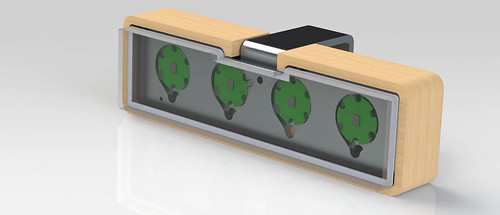
Solidworks Model. Magic!
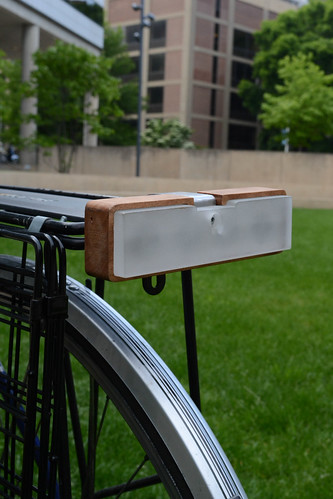
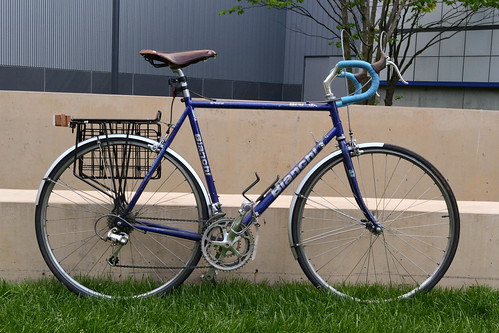
Oh, yes. Nice fender too.
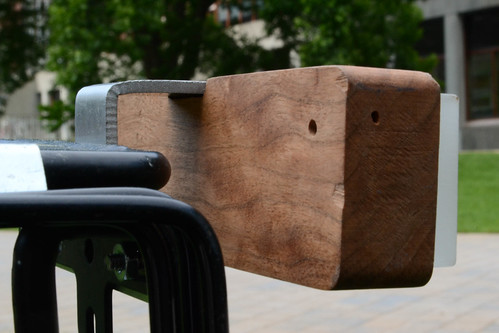
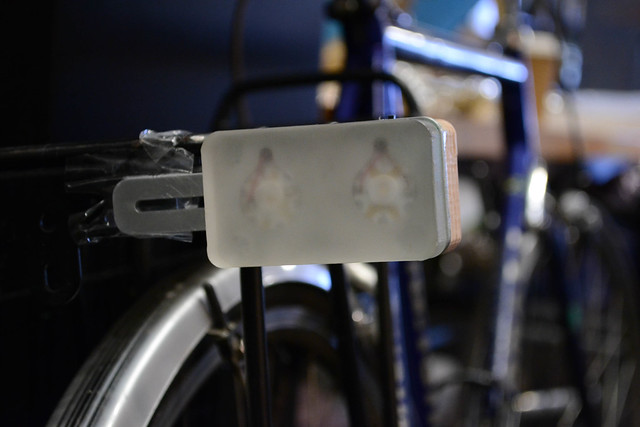
The holes are inspired by floppy disk drives. There are buttons in there, accessible only to those in-the-know. The backing is “curly” cherry, finishing in an outdoor-grade UV-resistant oil, recommended by the fine fellow at Rockler. That’s just one coat. I should probably do more, but this is still a prototype.
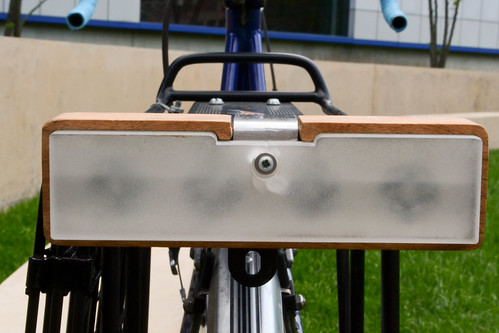
You can see the LED mounts in the back, there.
The diffuser doesn’t work perfectly.
The whole shebang.
Production Plan
Early on, I knew that I wanted to confine my design to readily available (at least for us) shop-tools. I imagined, less, a prototype leading into mass production–but more, a useful, practical product that could be more or less self-made in small batches–and sold to the necessarily small group of the interested.
Electronics
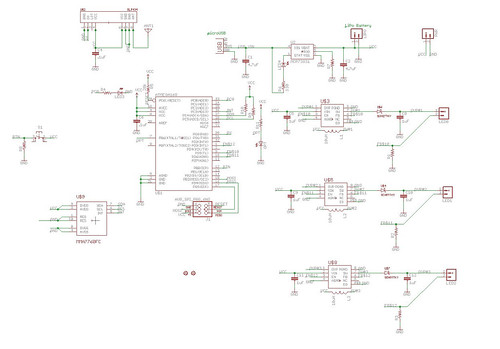
Fabbed-out PCB
The one I’ve got is from Advanced Circuits, $70. The two-layer, silk-screened premium items (whose design I hopelessly bungled), were half the cost and complete with soldermask, silk screen, and everything. All in all, the board is 1.25 x 2.35-around three square inches, so from a source like BatchPCB, can theoretically be had for under $10 apiece. I botched the first one — be wary of disconnected nets in Eagle: befriend the rule checkers. It’ll tell you that kind of thing, to avoid just these problems.

This doesn’t show the groundplane (which I should’ve ditched for the barebones circuit). You can see the three symmetrical boost circuits there, though, as well as the USB charger–accessible from the bottom of the light.
Yep. Just a bike light.
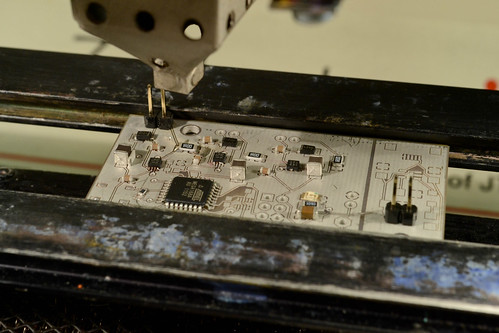
Reflowing the barebones board. There are footprints for an accelerometer and an optical sensor in there, but I haven’t done anything with them–or even mounted the components. Next round.
Components
Far and away, the most expensive components are the high-power LEDs. My design is somewhat unconventional–that is–it doesn’t make a whole lot of sense, as I’m running a lot of really high-end LEDs at a relatively low amperage. I ended up piling LEDs in there to get the forward voltage that a boost converter (a power-supply circuit that uses the power of Science to turn 3.7V into 7) needs to hum. That means I should have gone with some cheaper LEDs.
As it stands, the board has 8 LEDs, which run between 2.50 (for red) and 3.50 (amber) apiece. That’s $25 in LEDs alone. Crazy. Then, to maintain each separate LED channel, three independent boost converters are needed. I went with the MIC2291-MLF–with overvoltage protection. My first board was a dramatic failure, as one chip after another merrily fried itself into oblivion. The chip works by switching an inductor on and off very quickly–but it only knows how quickly to do that, based on the feedback it receives at the other end of the circuit. If your circuit isn’t connected–or intermittently connected–the switch is clueless and ramps the voltage up to values that kill the chip. That’s a different package, though, the SOT23, which is about 20 cents cheaper on digikey. Worth it, maybe, in the guts of a cellphone or something–but for the rough-and-tumble prototyping that we’ve been doing, the MLF with overvoltage is essential.
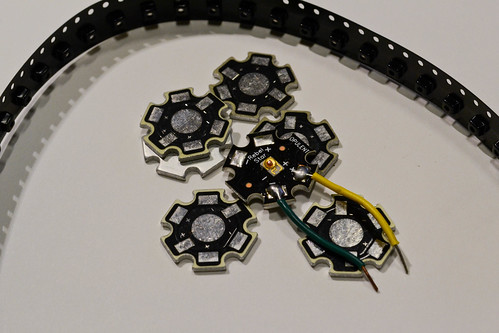
A strip of LEDs and some bare aluminum PCBs. The “stars” are made specifically for mounting high-power LEDs, which can generate a lot of heat. Truth be told, these are hardly necessary for this application, and in the next version, it’d simplify things a lot just to mount them straight to the PCB. I am also looking into custom aluminum PCBs, which would be the ideal situation, really.
That brings me to a brief digression on the subject of datasheets. The one in question, for the MIC2291, references both packages. They’re clearly different–it’s true–but discussion of overvoltage protection is relegated to a footnote beneath a figure: “OVP protection available on MLF package option only.” Of course, this is all a moot point with respect to my choices, as I had no idea what overvoltage protection was anyhow. life and learn.
NOTE: I have looked into ordering some lower-power LEDs, which are significantly cheaper than the high-power Cree or Luxeon lights, and rated for currents of ~150mA — still high than I’m running these now. I’d like to try swapping out the sense resistors at some point, and see just how much current can be usefully pulled through the LEDs. These LEDs, assuming I used the same number, are under a dollar-a-piece, even at small quantities. Suddenly, things don’t look so grim: $8 worth of LEDs.
In terms of other components, the remaining substantial chips is, of course, the Atmega168. That’s really overkill for the job, here, and I’m not sure why I used one, other than comfort. An AtTiny would have been fine. At any rate, that’s a couple of dollars down the tubes, that could have been saved. And then the charger and accompanying circuitry, which all told, is cheap: the IC there is only 40 cents.
And, of course, there’s a scattering of decoupling capacitors, pull-up resistors, and the regular detritus that clouds any honest electronic endeavor. Read all about it on the BOM. I stuffed the board relatively quickly, using solder paste and the hot-air reflowing machine, which eased the pain considerable.
Battery
The battery is a rechargeable 900mAH LiPo battery, like that sold by SparkFun. It’s made of a small sliver of gold. $8.
Materials:
- Wood
A variety of hardwoods–though I only got the chance to mill the cherry for the final prototype. Earlier prototypes were done in mahogany (I believe)–just a scrap that I found in the shop. I have about two-board feet of purpleheart and mahogany. The wood shown through here is curly cherry, which is $12 bd/ft at Rockler. The Mahogany and the Purpleheart were $14 bd/ft. A single piece, though, uses only about 12 cubic inches (not including losses to fixturing). At that rate, there is only a dollar worth of cherry in a single piece (not counting machining time, of course).
- 5051 1/8″ Aluminum
I ordered some of this from McMaster (for a small fortune, naturally) — before discovering the Central Machine shop, squirreled away in the basement of 38, where I picked up a square of the stuff for $10. One thing to note: if you’re planning on folding aluminum, the 5051 is the stuff. I hadn’t noticed until the guy at the machine shop brought it up, but my previous folds had small cracks in them. They still seemed pretty sturdy, but the 5051 is noticeably smoother. Again, amortized against the sheet, this stuff is cheap: a buck-per, max.
- 1/2″ Acrylic
This isn’t probably the best stuff for the job, but it’s what’s familiar and what I used. A half-inch thick square from McMaster ran to nearly $30, making it fairly expensive. All told, though, one piece goes a distance. Again, not account for material losses to fixturing (this sucker was cut on the waterjet too), we’re looking at $2.50 worth of acrylic.
- Gaskets
I ordered a grab-bag of materials from McMaster, which included a roll of cork and a variety of treated papers. Unusual stuff–very heavy, dense, “oiled” papers. I think these are mostly for use in plumbing, not for electronic gimcrackery like this — but I cut a couple of versions to provide a layer of water protection. $.50 cents, max.
Tools used:
I ended up using just about every tool in the shop. That had a lot to do with all of the quick fixes that I had to turn to, as the final design took shape. Once a real, reliable design is hammered down, I think everything could be done on the waterjet and shopbot. A CNC mill (like the Bridgeport) would be useful, particularly when working with the aluminum–but I think future versions will cut down on the amount of AL, which isn’t strictly necessary for the amount of heat generated.
- Waterjet
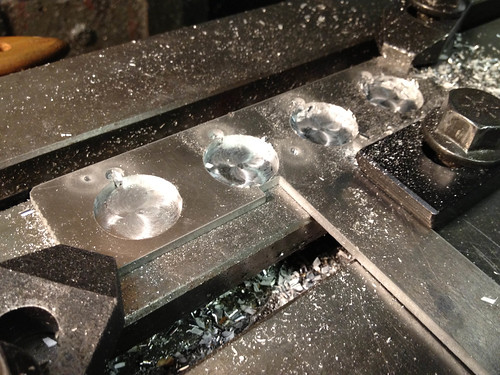
The waterjet was used to cut the 1/8″ aluminum backing. This took less than two minutes on the machine, and the arbitrary calcula-ma-tron on the toolpaths, charged it at $5 or so. I also ended up cutting the lenses on this as well, which was even quicker (one single profile.) Let’s call it $2, for no reason except that it was easy.
- ShopBot
The wooden body of the light was milled from a series of profiles generated in Solidworks. From start to finish, with a sharp router-bit running at a conservative 60 inches per minute (at 10k RPM), a single piece took 8:30 or so. I think we can lock another $10 or so here. I am making that up, of course, though I suppose I could look into hourly rentals for ShopBots.
- Bridgeport Mill
Pockets for the LED heatsinks and assorted details were milled on an NC Bridgeport. This could have been CNC, but it wasn’t, as I didn’t get my act together to navigate through the arcane series of steps required to (a) get valid g-code and (b) smash onto a floppy drive — so I did most of this in “conversational mode”, that was really slow. I probably spent 30 minutes per-piece, prepping it for the various details that were not accounted for in the profiles. In terms of labor, this was a major (non-digital) time-sink. Let’s call is $50 in milling-time.
- Brake
Folding the aluminum backing into shape was quick and lovely. I could have, perhaps, used the waterjet to indicate the placement of my folds, but as it was, they were just 90 degree bends and not difficult. Still, another 5 minutes and say, $5.
- Lasercutter
The oil-paper gaskets were cut using light-power. $.50.
BOM Round-Up
- PCB fab costs: $70
- Stuffing: $20
-
Electronic component costs:
- LEDS: $25
- Battery: $10
- Everything else: $12
- Electronics Total: $47
-
Materials Costs:
- Wood: $1
- Aluminum: $1
- Acrylic: $2.50
- Gaskets: .25
- Screws, washer: .25
- Material Total: $5
-
Tooling and Machining Costs:
- ShopBot: $10
- Waterjet:
- Al: $5
- Acrylic: $2
- Bridgeport: $50
- Brake: $5
- Lasercutter: $.50
- Hand-assembly, finishing: $30
- Total machining costs: $103.50
Total: $245.50
Brutal. Throw a 3x mark-up on that sucker, and we’re looking at a $750 artisanal bikelight. And it’s not even weatherproof. Of course, the savvy will notice that a lot of the big-ticket items in there can be ditched. In any quantity, the PCB costs drop really quickly–down to single digits. Stuffing, too, as just about everthing is surface mount–though final-state assembly and LED-mounting would have to be streamlined. Material costs are already shockingly low, for such a deluxe material set-up. And I think my machining costs are pessemistic, particularly when it comes to milling. The entire aluminum component could be done in a high-speed CNC mill en masse, for a fraction of the cost.
Revised BOM for Production
Here’s an (optimisitic) plan for 50 lights.
PCB: $6
PCBs will be manufactured by Advanced Circuits or APC. In quantity, prices fall dramatically. If I were to order 50 boards on a four week lead time, it’d come to 5.79.
Stuffing: $6
I have no idea about this, but I saw quoted somewhere that stuffing was 1:1 with fab costs.
Additional handwork: $6
The LEDs (for now) are custom mounted on the heatsinks, and then jumpered onto the board, which is slow and tedious. This could be a lot quicker, but soldering to the heatsinks is not something I’m good at. In a proper reflow oven and such, I’m sure this could be made easy. Conductive epoxy might work well too.
Total PCB: $18
Electronic components:
These will be ordered from DigiKey. At volumes of 50, prices do fall, but not super-considerably. What savings there are, are in downgrading the class of LED, as I am simply not running at the amperage specc’d for by the previous (more costly) models.
- LEDs: $8
- Battery: $10
- Caps, resistors, ICs, etc: $12
Total electronics: $30
- Materials: $5
These will be procured locally and are already cheap.
Tooling and Machining:
I still think these toolings costs are high. Essentially, this is what I think it should run–per-piece–if I were to job it out. If I were doing it myself, I don’t think I would have a problem cutting 50 wooden enclosures and 50 aluminum backplates over the course of a day or two. The brake would be tedious, but would be another couple of hours. A lot of the time sinks are in having a design that’s imperfectly calibrated for use on the machines that I have access to. In any small quantity, this wouldn’t be a problem, so costs would come down. I would be really curious to send out some of these designs (a waterjet, quote, for example, on the Al part) and see what comes back. At the moment, though, I’ll say, “I am going to do this.”
- CNC Mill: $10
- Waterjet: $7
- Brake: $5
- Hand-assembly, finishing: $10
Total machining costs: $32
Total: $78
Well, that’s still fairly astronomical–there are not many people who want a $200 bike light — but there is some space there, perhaps. Bikes, like cars, are items that people lavish insane expenditures on–and USB-rechargeable high-quality bike lights (typically a forward headlamp) can run into triple digits. All the same, I do not thing that I’m looking at a market disruptor here, which makes sense, as that was never the goal to begin with. I am disappointed though, what with all the machining costs and the basic expense of having so much circuitry, that this cannot be a cheaper item.
Initial Capital
For a limited run of 50, which honestly, is about all I can handle, it’s a semi-manageable investment: 50 x 78 = $3900.
As for the target audience, well, we’ll see. As is the case with all things in the world, there’s a scene of intense bicycle connoisseurship which might be interested in such thing. Oddly enough, the ‘retro’ market is big in bicycles — see Brooks saddles (mine), shellac’d & twine’d handlebars (mine), or wooden bike lights (uh, mine).
Software used:
- Solidworks
- Illustrator
Files
Solidworks Assembly & Parts: Models
Eagle Schematics: Schematics
Midterm
It uses two high-power LEDs — at 750 mA from a rechargeable lithium-ion polymer battery, these suckers are bright! — along with a radio link, to make a handlebar-controlled rear alert light and turn signal for a bicycle.
Bike Light from Sam Jacoby on Vimeo.
A video of the beast in action. Honestly, it’s too bright to really look at. I’ll have to tone down boost convert (it takes a PWM signal from a microcontroller), to make it “street safe”).
This is a lousy photo of (half) of it attached to the back of a bike. Yes, I used tape. This prototype’s casing is half mahogany (found in scrap bin!) and fronted with sand-blasted acrylic. The hardware itself is amounted to a milled piece of eighth-inch aluminum.
how much. is shipping free